Saturday 30 March 2013

Easter craftables for the babes in a flash!

Easter?  Really?

Now far be it from me to be Mrs Minus, I love the celebration of Easter as each year I find it's so needed after the long hard winter...daffs, colour, flowers, smells (and occasional sights!) of the sun....freshly cut grass and the Springish pastel colours that pop up everywhere.  Gorgeous.

No, my problem is  that my head is still in January somewhere.  With that in mind, my Mum and I went shopping on Wednesday to do try and get prepared for family staying and perhaps more importantly, the children at home for TWO WEEKS?!  huh?!

All it took was a good food shop, bit of planning with Mum over coffee & muffins and hey presto I'm home with a clean car, boot full of nosh and 24hrs to kick the house into some sort of order for the holidays.


Day 2 now of the Easter break and we are on our way to having a brill Easter with the mega thrill of seeing lots of lovely pals and family that we never get to see enough.

Easter activities in a flash?  There are plenty.  So far mine have been too wrapped up in everything other than needing to be occupied - if it ain't broke and all that!

This morning though, I boiled up some eggs..am ashamed to say with the egg still in...yeah right, egg-blowing etc, etc...sounds great but my babes would break the delicate shell in a second...with that in mind I thought that being smelly would be better than heartbroken so...

Boil and cool.  When cold, gather a smidge of glue, anything that you can add that you have around...sparkles, gems etc.  A couple of marker pens here are a must...and of course some googley eyes...bonza....happy babes with smelly eggs.

Position, photograph and enjoy for 24hrs then slide into the bin without the children noticing...everyone's a winner!

Happy Easter everyone x


Sunday 24 March 2013

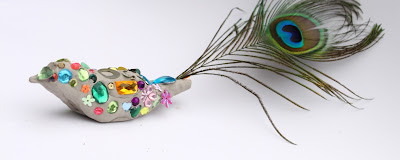
'Crafting BEAUTIFUL BIRDS' from Clay, with lashings of jewels & sequins and lovingly finished off with smothers of PVA...VERY excited about this one!

This activity proved to be an absolute winner!  

The children LOVE working with clay.  I have just had my third lot delivered - have gone from 2kg, to 5kg to now 12.5kg as its so in demand!

This activity is called 'Crafting BEAUTIFUL BIRDS'.

You will need:

Airdrying clay
Beads/sequins/Sparklies
Feathers
Googly eyes.
PVA Glue


1.
Take a palmful of clay and begin to mould into a bird shape.  It doesn't have to be brilliant but we googled some bird shapes and worked from those.

2.
Applique is the way here.  Enjoy every moment of applying all your sparkles.  Glitter might work really well here too.


 3.
Once your bird is looking lovely it's off to the airing cupboard with it.    24hrs in the warmth is all thats needed.  If you don't have a warm space pop it on the radiator and leave well alone for a day or two.
4.
When your bird is dry, you need to cake it with PVA glue.   The glue dries clear so don't worry about layering it on.  Once again, leave to dry overnight.
5.
When your bird is dry, she is ready to enjoy.

Much love, Sam x


'Artypops Easter Art Workshop for Children'. April 9th. 4 Spaces left!


Sunday 10 March 2013

Let's make...'Dreamy Dream Catchers' Perfect for a rainy afternoon in with the babes..

'DREAMY DREAM CATCHERS'

Perfecto for rainy afternoons indoors, another gem from the wonderful Marion Sweet...now retired childminder after some 20 years and all round general superstar in all things make & do-ey!  I adore her. 

Righto:

Gather all the materials that you can muster, Marion have tried to use all things that we might have around the house.

You will need:

A paper plate with the centre cut out
Colour felt tips
Tissue papers and shapes
2 circles of sticky back plastic which is slightly bigger than the cut out shape in the paper plate
Thread
Beads, etc
Blu tack
Pencil


1.
Decorate the back of the plate


2.
Place one of the sticky back plastics on the circle cut out.

3.
Put the shapes and tissues onto the sticky back and then place the other circle of sticky back in place.


& turn it over...et voila!  Looking gorgeous.


4. 
Take some blu tack and place at the BOTTOM of your plate.  With the blu tack in place, take a pencil and make 3 holes through the blu tac and the plate (this adds weight).

5.
Take your thread and place 3 lengths into the holes and make them secure.  Hang anything you wish onto the threads, beads, feathers, etc.

6.
Repeat again to make a hole at the top of the plate so you can hang your dream catcher and tada...we are there with a BEAUTIFUL Makey-doey!  Well done you!

Much love

Samantha Barnes, but much more Marion Sweet..(well done again Marion!)